Release 0.8.20 – What to Expect
The OpenBoxes team is excited to share the new OpenBoxes design with all the users! We are committed to creating an accessible, relevant, and user-friendly experience for users.
The goal of the new OpenBoxes design is to make YOUR experience in OpenBoxes better! So, please do not hesitate to give us feedback on the new design. If you don’t like something or something is confusing to you, we want to know. You can email openboxes@pih.org to share your comments, errors, or any confusion.
In addition to the new design, we also have improvements for existing features. Finally, we have addressed bugs reported by OpenBoxes users.
New OpenBoxes Design
With the new OpenBoxes Design, we have also updated the documentation! Please see our Knowledge Base to learn more about navigating OpenBoxes.
In this release, we have applied the new design to the Location Chooser, Menu Top Bar, and List Pages.
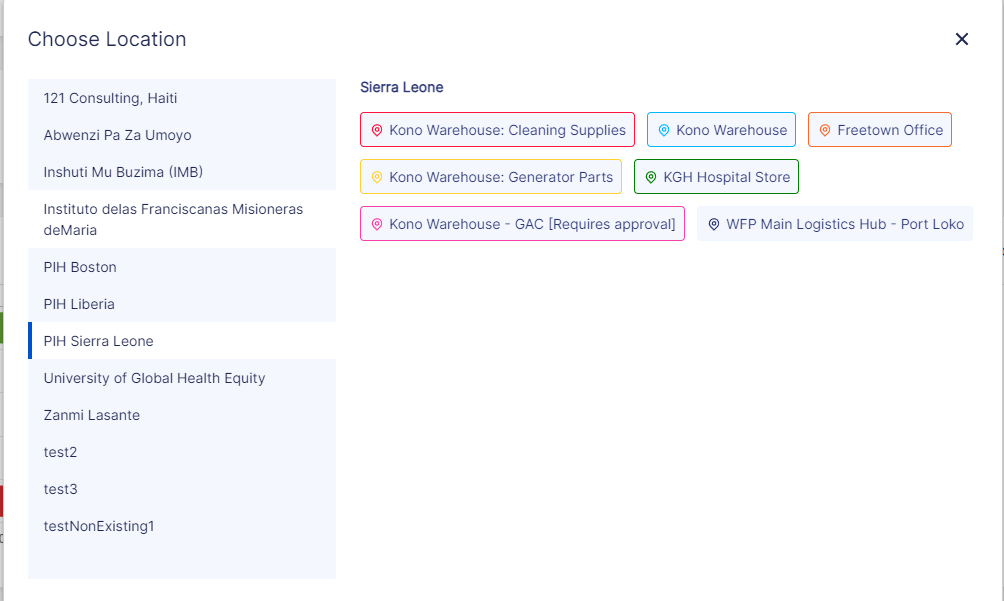
Location Chooser
Welcome to the new look of the Location Chooser!
Users will see all the locations that they have permission for. Locations that were previously filled with color now have a colored outline, as displayed below.
Menu Top Bar
The Top Navigation Bar has been consolidated into a single row. This top bar is the new design for all pages across OpenBoxes.
![]()
Organization & Location
![]()
- The Organization Image is now displayed as a square. When uploading an image, it should be in size 40x40 to be displayed correctly.
- The Location button is also on the left-hand side and shows a maximum of 20 characters. Names longer than 20 characters will display “…” at the end. Users can hover over the location to see a tooltip with the full name.
Menu Tabs
![]()
- Users can hover on the Menu tabs, which will display the corresponding dropdown with a list of page options.
- To return to the Dashboard from any page in OpenBoxes, users can simply click on the Organization Image or Dashboard.
Right-hand Icons
There are four icons on the right-hand side.
![]()
Hovering over any of the icons will display the name of the buttons as described below:
- We have our Global Search Bar. We just have to click on the “Magnifying glass”
 on the right side.
 - Our handy-dandy Knowledge Base is just a click away. Click on the help icon
 , which loads the Knowledge base.
 - Users with Configuration access can click on the settings icon
 , which displays the dropdown for Configurations. Note: The Configuration icon will not display for non-admin users.
 - Clicking on the Profile Icon
 loads the dropdown with these options: edit profile, enable localization, refresh, and logout.
List Pages
Our Redesigned List pages include Inbound List, Outbound List, Purchase Order List, Transfer Order List, Product List, Invoice List, and Stocklist pages.

Header
The List Name is shown on the left-hand side. On the right-hand side, there are additional functional buttons.
![]()
Based on the list page type, you will see different buttons. Here are the different buttons based on the list page type that we will see on the header. The buttons in Blue are highlighted in blue on the List page, as seen in the screenshot above.
- Product List Page: Import Products & Add Product.
- Inbound Movement List Page: Create Shipment from PO, Create Stock Movement & My Stock Movements.
- Outbound Movement List Page: My Stock Movements & Create Stock Movement.
- Stock Transfer List Page: Create Stock Transfer
- Stock List: Add Stocklist
Filters
Gone is our left-handed filter list! Filters are now on the top of the list page.
![]()
- You can choose to Show or Hide Filters.
- When filters are selected, the number of filters will be displayed on both the “hide/Show filters” button and the selected fields.
- The existing filters are still present: Status, Origin, Destination, Requested By, Created by, Updated By, Created Date, and Created Before.
- Users can select multiple statuses to filter by.
- Once you add filters, click on the Search button to apply the filters.
- To remove any applied filters, click on the Clear button.
Table
The table now takes up more screen space to make viewing data easier!
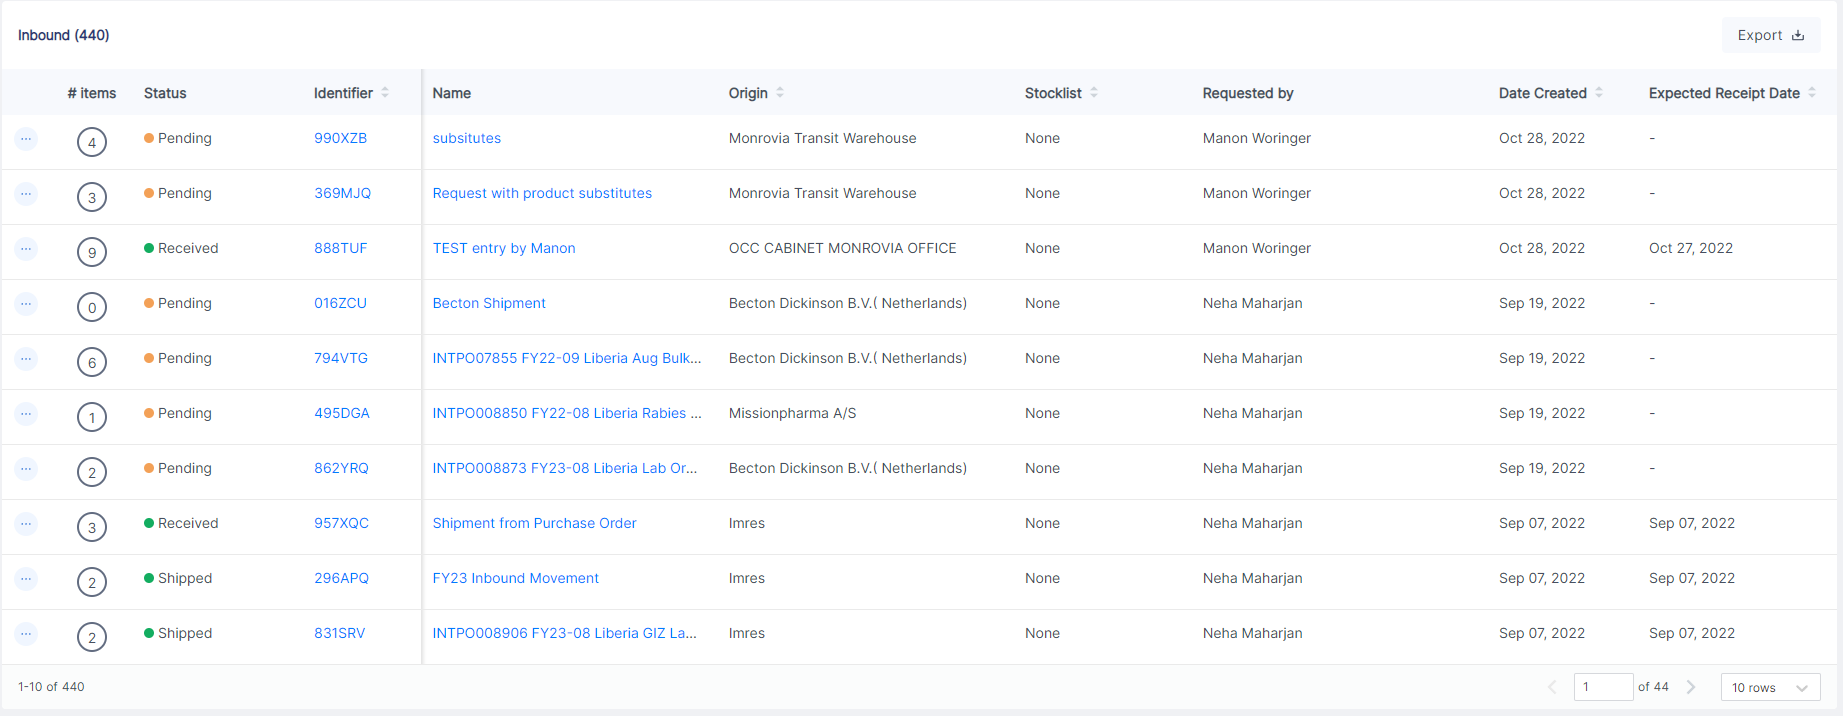
- The Export button is now in the Table instead of in the Filters section. Exception: Stock Transfers List does not have an Export option.
- There are three dots icons on the left-hand that users can click on to take actions we can take, such as show, edit, and delete.
- Users can now sort certain columns, such as Status, Identifier, Destination, Stocklist, and Dates. Columns sort alphabetically or from earliest to latest as applicable to the column data.
- The first three columns of the table are fixed.
- Hovering over Statuses for each line will show a tooltip with more details on the status.
- There is a horizontal scroll to view additional columns with the first three columns fixed.
In addition to the above changes, the Purchase Order List page also shows the Total Amount bar underneath the Table.
Status Descriptions
There are different statuses that we see on various list pages. However, it is not always clear what those statuses mean. You may ask, “What does ‘verifying’ mean on an Outbound Stock Movement list page?” To help with that, we have added tooltip descriptions for statuses on the list pages.
Here are the new descriptions:
Inbound Stock Movement List Page
- Pending: This shipment has been created but not shipped yet.
- Shipped: This shipment has been sent.
- Partially Received: Part of the shipment has been received.
- Received: All of the shipment has been received.
Outbound Stock Movement List Page
- Created: This shipment has items added to be shipped / Items are being added to this shipment.
- Verifying: The quantity of items added to this shipment needs to be finalized.
- Picking: The inventory selection needs to be finalized.
- Picked: This shipment is ready to be shipped. The packing information may need to be entered.
- Issued: This shipment has been shipped out.
- Checking: This shipment is ready to be shipped.
Feature Improvements
Menu
To simplify menu views, we have hidden buttons from non-admin users are not able to use, including the configuration button and Create Stock list button in the Stock list menu.
![]()
Refresh on List Pages
On Redesigned List pages, the “search” button refreshes any updates on the search list. We no longer have to clear the filters, add the filters, and search again.
For example, if a user applies a filter of status “Pending” to the PO List page, then opens a Pending PO in a new tab and places the PO. Now, if the user goes back to the already filtered list page, and clicks on ‘Search’ again, the list will update the Pending status to Placed.
Product Management
Based on user feedback, we have made several feature improvements for easier product management.
- Auto increment of Product Code. OpenBoxes can now indicate the most recent product code if teams want to start the Product Code at a certain number.
- Product Import. When using product import, product code is now automatically generated based on the product type’s code and identifier in an auto incremental way, just like when a product is created manually.
- Product Association. For better product management, we have added additional association types that users can use to associate products in addition to the existing product association types:
- Consumable
- Preventative Spare Part
- Corrective Spare Part
See this document for more details on the product association types.
- Product Associations Import. It is now possible to Import Product Associations instead of adding them manually one by one for each product!
- When creating a Product type, users will now see a validation error if the product identifier and product code are left blank. Since we cannot create products with a Product type that does not have a product identifier and code anyways, this validation will make sure users create product types with the identifier.
- For the change mentioned above, we have also added validation for already existing product types without identifiers and codes. When users create products for product types without identifiers and codes, a validation will appear that they will not be able to create product types with empty codes.
Permissions
- User with admin, manager, and assistant permissions can now delete pending Putaway.
Bug Fixes
- Incorrect bin location in downloaded Picklist. When an item is moved from one bin to another bin location and added to a stock movement, the downloaded picklist displayed the incorrect bin location. This user-reported bug has been resolved. The downloaded picklist will now show the correct current bin location.
- Purchase Orders cannot be shipped when not in the destination or central purchasing location. A bug where users could ship a PO when not in the destination location or central purchasing location is now fixed.
- Import errors for Outbound Stock Movement are now fixed. When users create an outbound stock movement, users can import products to add to the stock movement. However, the import process displayed an error for products that require a lot and expiry. Now, the users can import Outbound import without lot and expiry even if they are required for the product.